SMQTK/C++ Bridge
The SMQTK C++ Bridge is a mechanism that allows C++ based programs to make calls to the Python based SMQTK project. In particular, it allows a C++ program to call the SMQTK descriptor engine by providing an image as input and receiving a feature vector in return.
The bridge is based on Kitware’s KWIVER project. In particular it uses the data types and core services provided by KWIVER’s VITAL project and the pipeline processing (including Python compute nodes) provided by SMQTK’s Sprokit project. The Block Diagramm of the SMQTK/C++ Bridge shows the structure of the solution.
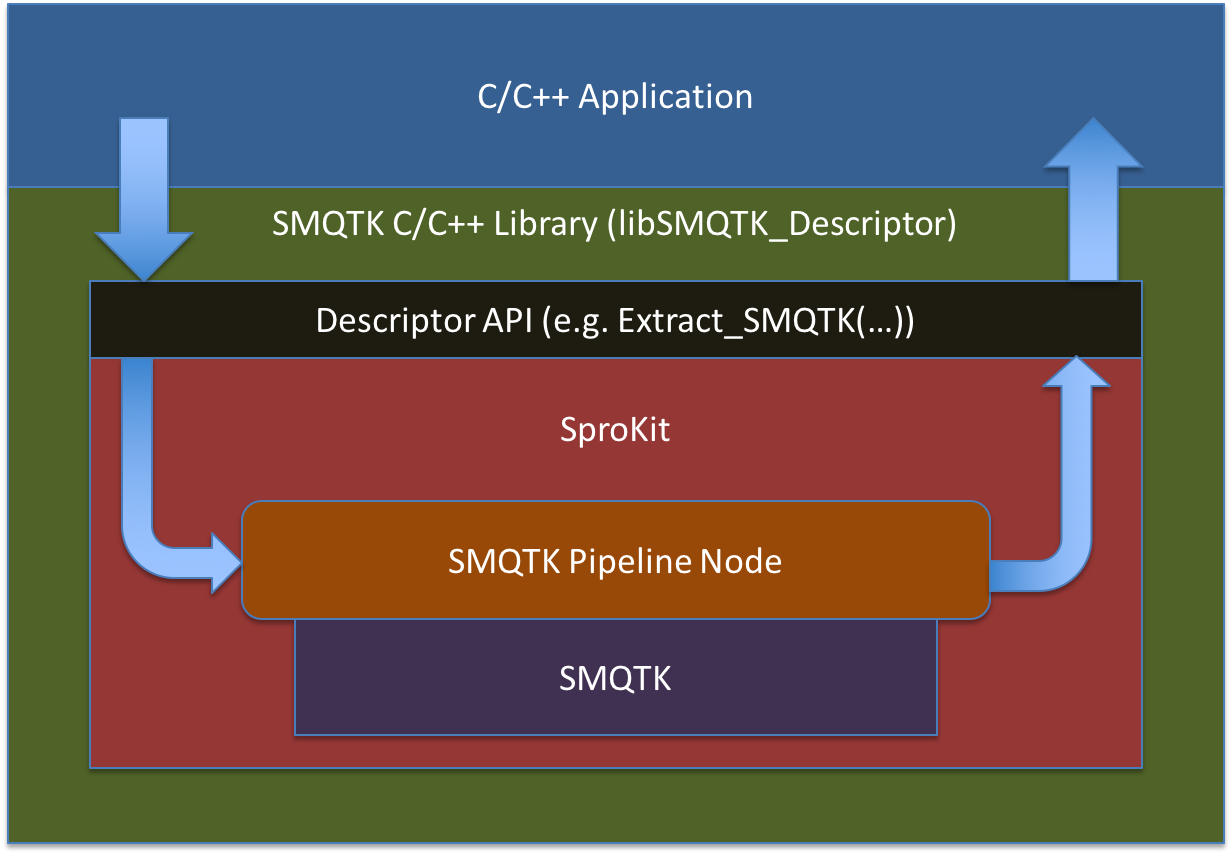
Block Diagramm of the SMQTK/C++ Bridge
The KWIVER repository and its associated build framework takes care of building VITAL and Sprokit once it’s properly configured. Also, in order to build KWIVER, you must build some of the third party dependencies maintained by Kitware’s Fletch project ( a repository that is used to manage the build of a variety of computer vision and machine learning tools).
This document will help you configure Fletch and KWIVER so that you can use them with SMQTK and Python. It will also discuss the C++/SMQTK bridge and how you can integrate it into your projects.
The instructions assume that you will set up a directory structure similar to the SMQTK/C++ Bridge Source Organization shown.
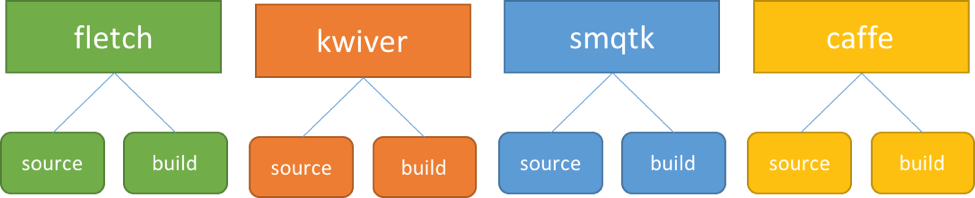
SMQTK/C++ Bridge Source Organization
These projects are interdependent, so you’ll want to fetch the repositories and checkout the correct branch for all of them first.
Getting the Code
Fletch
In the Fletch directory:
git clone https://github.com/Kitware/fletch.git source
cd source
git checkout master
KWIVER
In the KWIVER directory:
git clone https://github.com/kitware/kwiver.git source
cd source
git checkout master
SMQTK
In the SMQTK directory:
git clone https://github.com/Kitware/SMQTK.git source
cd source
git checkout v0.2
CAFFE
In the CAFFE directory:
git clone https://github.com/BVLC/caffe.git source
cd source
git checkout rc2
./scripts/download_model_binary.py models/bvlc_reference_caffenet
./data/ilsvrc12/get_ilsvrc_aux.sh
For CAFFE, in addition to obtaining the source code, we’re fetching some pre-trained models that we can use.
Setting up a Python Environment
In order to use the SMQTK/C++ bridge, you must have a Python environment on your system. We recommend installing the Miniconda environment from Continuum – an open source Python environment that makes it very easy to set up Python for scientific computing.
Make sure that the Miniconda python command is the first one in your PATH:
export PATH=~/.miniconda/bin:${PATH}
We will also need to create an SMQTK conda environment in which we will run SMQTK:
conda create -n smqtk --file smqtk/source/requirements.conda.txt
source activate smqtk
pip install -r smqtk/source/requirements.pip.txt
pip install scikit-image
pip install protobuf
Building the Code
Fletch
Note
It is important that only the Miniconda environment (and not
the smqtk environment is active when building fletch. Run source
deactivate to be sure.)
From your Fletch directory:
mkdir build
cd build
cmake -C ../source/sprokit/processes/examples/call_SMQTK_pipeline/fletch-precache.cmake ../source/
This will configure Fletch to build the projects that KWIVER needs to build properly for use with SMQTK/C++ bridge.
To actually build Fletch execute the command:
cmake --build .
(Note that there is period (.) at the end of that command)
KWIVER
Note
It is important that the SMQTK Miniconda environment
is active when building fletch. Run source
activate smqtk to be sure.
What follows are the steps required to build KIWVER to provide the SMQTK/C++ bridge
In the KWIVER directory:
source
activate smqtk
mkdir build
cd build
To configure the build:
cmake -Dfletch_DIR:PATH=../../fletch/build/ -C ../source/sprokit/processes/examples/call_SMQTK_pipeline/kwiver-precache.cmake ../source/
Verify that the PYTHON specifications are correct (assuming you installed miniconda in ~/miniconda):
PYTHON_EXECUTABLE           ~/miniconda/bin/python
PYTHON_INCLUDE_DIR          ~/miniconda/include/python2.7
PYTHON_LIBRARY              ~/miniconda/lib/libpython2.7.so
And finally, build KWIVER:
make
make install
CAFFE
One of the feature’s of SMQTK is that it can use a CAFFE based CNNN as a descriptor. In general, you simply need to build CAFFE with it’s Python bindings turned on:
mkdir build
cd build
cmake -DBOOST_ROOT:PATH=../../fletch/build/install/  -DOpenCV_DIR:PATH=../../fletch/build/install/share/OpenCV/ ../source/
make
make install
Testing the Code
Set your PATH to include the new projects. The following commands will set the environment so the examples can be run:
source kwiver/build/install/setup_KWIVER.sh
source smqtk/build/setup_env.build.sh
export PYTHONPATH=${PWD}/caffe/build/install/python:${PYTHONPATH}
To test that the the SMQTK/C++ bridge is working, we will run the
SMQTK_Descriptor_test application. This application is an example
C++ application that accepts a configuration file to specify the
location of your CAFFE installation model, files and GPU configuration
and a single image or list of images and submit that image (or
images) to SMQTK to have CAFFE compute the descriptor. The application
does nothing with the descriptor other than print the first 50
elements. This is a sample program only. You may wish to read the
source code for the program in kwiver/source/examples/call_SMQTK_pipeline
to see how you can adapt this technique to your own programs.
To use the application, you’ll need to provide it with a configuration file that tells it what descriptor to use.
Here is an example configuration file that uses SMQTK’s CaffeDesriptorGenerator to run the ImageNet CNN and use the 7th layer as a descriptor:
{
        "CaffeDescriptorGenerator": {
        "batch_size": 256,
        "data_layer": "data",
        "gpu_device_id": 0,
        "image_mean_filepath": "/path/to/caffe/source/data/ilsvrc12/imagenet_mean.binaryproto",
        "load_truncated_images": true,
        "network_is_bgr": true,
        "network_model_filepath": "/path/to/caffe/source/models/bvlc_reference_caffenet/bvlc_reference_caffenet.caffemodel",
        "network_prototxt_filepath": "/path/to/caffe/source/models/bvlc_reference_caffenet/deploy.prototxt",
        "return_layer": "fc7",
        "use_gpu": false
        },
"type": "CaffeDescriptorGenerator"
}
The command to run the test application is as follows (all one line, run from the kwiver/build directory):
LD_PRELOAD=~/miniconda/envs/smqtk/lib/libpython2.7.so.1.0 ./examples/call_SMQTK_pipeline/SMQTK_Descriptor_test my-caffe-config ../source/examples/cat.jpg
Note
The “LD_PRELOAD” variable setting is required to make sure that sprokit does not try to use the system python instead of the SMQTK python environment you created. We will be working to make this unecessary as soon as possible.
When the application runs, it will eventually print out lines that look like this (after many log messages):
Descriptor size: 4096
0 0 0 0 0 0 3.53588 0 0 0 0 3.3475 0 0 0 0 1.67483 0 0 0 0 0 0 0 0 7.86536 0 0 0 0 0 0 0 0 0 0 0 0 0 0 0 0 0 0 0 0 0 0 0 0
Which represents the first 50 elements of the returned feature
vector. If all of the elements are the value 0.223, then
something went wrong and the feature vector was not run
If you wish to use a different model, say AlexNet, make sure you run ./scripts/download_model_binary.py models/bvlc_alexnet in the
Caffe source directory and then you can create a different configuration file that specifies /path/to/caffe/source/models/bvlc_alexnet/bvlc_alexnet.caffemodel
for network_model_filepath and /path/to/caffe/source/models/bvlc_alexnet/deploy.prototxt for network_prototxt_filepath.
Using the SMQTK/C++ Bridge in Your Code
The C++ interface to SMQTK descriptors is through the SMQTK_Descriptor class as defined in the include file SMQTK_Descriptor.h.
The SMQTK descriptor API is built as part of kwiver and is available in the library libSMQTK_Descriptor.so.
You will need to add this to your build instructions as -lSMQTK_Descriptor or in an equivalent manner appropriate
for your build system.
The class provides a single method to apply the descriptor to an image and return the descriptor vector, which is described as follows:
std::vector< double > ExtractSMQTK( cv::Mat cv_img, std::string const& config_file );
- cv_img
- An image in OpenCV format
- config_file
- The name of the SMQTK descriptor configuration file in JSON format. See Testing the Code for details.
The ExtractSMQTK() method is synchronous in that it will return with the descriptor vector even though the descriptor calculation may be multi-threaded.
The source code for the call_SMQTK_pipeline provides an example of how to use this call in your own programs:
Include the file SMQTK_Descriptor.h in the source code to get the interface to the SMQTK_Descriptor class, as shown below:
#include "SMQTK_Descriptor.h"
The following two source statements implement and apply the descriptor:
kwiver::SMQTK_Descriptor des; // Create object
std::vector< double > results = des.ExtractSMQTK( img, file_name );
The inputs are the OpenCV format image and the name of the descriptor configuration file. The output is the descriptor vector of doubles.
A sample program is provided in the source file SMQTK_Descriptor_test.cxx which serves as a test of the API and an example of how it is used. The operation of this test program is discussed above.